Yahoo! UI Library: Calendar
The Calendar component is a UI control that enables users to choose one or more dates from a graphical calendar presented in a one- or two-up view. The calendar generated by this control is completely client-side and can be navigated without any page refreshes.
カレンダーのライブラリ
Calendarコンポーネントはグラフィカルなカレンダーから日付をピックアップできるUIコントロールです。カレンダーはクライアントサイドで完結するようにつくられ、ページ遷移せずにやり取りできます。
Documentation
API Documentation: Reference documentation for each of the methods, properties, and parameters defined by this component.
メソッドやパラメータ、等々の詳しいことはAPIドキュメントを参照してください
Getting Started
コンポーネント間の依存性に注意してください。
<!-- Namespace source file --> <script src = "http://yourwebsite.com/util/YAHOO.js" ></script> <!-- Dependency source files --> <script src = "http://yourwebsite.com/util/dom.js" ></script> <script src = "http://yourwebsite.com/util/event.js" ></script> <!-- Calendar source file --> <script src = "http://yourwebsite.com/widget/calendar.js" ></script>CalendarオブジェクトはYAHOO.widget.Calendar. で定義されます。
For a simple single-select calendar implementation, include a placeholder block that represents the area where the calendar will be rendered on the page:
<div id="cal1Container"></div>HTMLとCSS準備の基本
日付を一つだけ選択できるカレンダーを使ってみます。カレンダーを描画できるようにブロック要素の領域を設けてください。
Initializing the Calendar
Create a calendar by instantiating Calendar with the ID of the element where component is to be inserted on the page.
var cal1;
function init() {
   cal1 = new YAHOO.widget.Calendar("cal1","cal1Container");
   cal1.render();
}
By default, the calendar is set to the current month, and enables a single selection to be made. In addition to the id, the calendar can accept two additional parameters -- the default month and year to display and the date(s) to select. The full constructor is defined as follows:
YAHOO.widget.Calendar(String id, String containerId, String monthyear, String selected)Where:
- id is the ID that should be assigned to the calendar component table element
- containerId is the id of the HTML element where the calendar will be inserted
- monthyear is the month/year string used to set the current calendar page
- selected is a string of date values formatted using the date parser.
The built-in default date format is MM/DD/YYYY. Ranges are defined using MM/DD/YYYY-MM/DD/YYYY. Month/day combinations are defined using MM/DD. Any combination of these can be combined by delimiting the string with commas. For example: "12/24/2005,12/25,1/18/2006-1/21/2006"
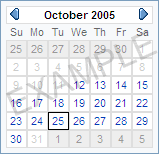
The basic 1-up calendar looks like this:
カレンダーの初期化
カレンダーを作るには要素IDをつかって初期化します。要素IDはコンポーネントを挿入する要素からとります。
//初期化関数
var cal1;
function init() {
   cal1 = new YAHOO.widget.Calendar("cal1","cal1Container");
   cal1.render();
}
初期設定でカレンダーには現時点での月がセットされいます。また、日にちが一つだけ選択できるカレンダーになっています。要素IDに加えて、2つの追加パラメーターを渡せます。
①表示する年・月
②選択できる 日?
コンストラクタで全部定義するとこんな風になります//パラメータは全て文字列で YAHOO.widget.Calendar(id, containerId, monthyear, selected)補足:
- idはカレンダーコンポーネントをセットするテーブル要素のID
- containerIDはカレンダーを挿入するHTML要素のID
- monthyerは カレンダーにセットされる「月」と「年」の文字列です。
- selected はdate parser を使ってフォーマットされた「日」の文字列です。
組み込みの日付フォーマットは、 MM/DD/YYYY (月/日/年)です。日付の範囲を指定する際はMM/DD/YYYY-MM/DD/YYYY と書きます( '-' ハイフンに注意) 月/日 のセットは、MM/DDで定義します。コンマで区切りを入れれば、どんな組み合わせも可能です。
For example: "12/24/2005,12/25,1/18/2006-1/21/2006"
基本となる「1-up」カレンダーはこのようになります。
(1-upは一個だけ選択できるカレンダーのことですね。残機が増えるキノコのことではありません・・・)
Using Calendar
This section describes customizations to the Calendar component.
- Creating a 2-Up Calendar View
- Creating International Calendars
- Customizing the Calendar
- Customizing Events
カレンダーを使う
このセクションでは、Calendarコンポーネントのカスタマイズの仕方を載せています
- 2upカレンダーをつくる
- 国際仕様のカレンダーをつくる
- カレンダーのカスタマイズ
- イベントのカスタマイズ
Creating a 2-Up Calendar View
Creating a 2-page calendar is as simple as modifying the markup and the class that is used. The container ID should be set into the container, and the Calendar2up class will handle the rest.
<div id="container1"></div>The constructor for Calendar2up is almost identical to the constructor for Calendar:
YAHOO.widget.Calendar(String id, String containerId, String monthyear, String selected)
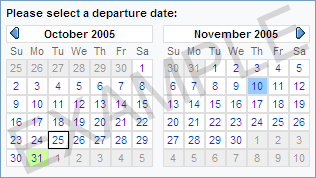
The 2-up calendar looks like this:
2upカレンダーを作る
2ページ仕様のカレンダーを作る作業は、HTMLとクラスをちょっといじる程度です。containerIdをコンテナとなる要素にセットしておく必要があります。のこりの作業はCalendar2upクラスがやっといてくれます。
<div id="container1"></div>Calendar2upクラスのコンストラクタは、Calendarクラスのコンストラクタとほぼ一緒です。
YAHOO.widget.Calendar(id, String containerId,monthyear,selected)

*引数は全て文字列で
結果はこんな感じになります。
Creating International Calendars
The Calendar component has built in support for internationalization. To modify the locale, simply implement the Calendar's customConfig method to override the default Config.Locale object. The following code example produces a calendar in German:
var cal1 = new YAHOO.widget.Calendar("cal1","cal1Container");

cal1.prototype.customConfig = function(){
this.Config.Locale.MONTHS_SHORT = ["Jan", "Feb", "M䲦quot;, "Apr", "Mai", "Jun",
"Jul", "Aug", "Sep", "Okt", "Nov", "Dez"];

this.Config.Locale.MONTHS_LONG = ["Januar", "Februar", "M䲺", "April", "Mai",
"Juni", "Juli", "August", "September",
"Oktober", "November", "Dezember"];

this.Config.Locale.WEEKDAYS_1CHAR = ["S", "M", "D", "M", "D", "F", "S"];

this.Config.Locale.WEEKDAYS_SHORT = ["So", "Mo", "Di", "Mi", "Do", "Fr", "Sa"];

this.Config.Locale.WEEKDAYS_MEDIUM = ["Son", "Mon", "Die", "Mit", "Don", "Fre", "Sam"];

this.Config.Locale.WEEKDAYS_LONG =["Sonntag", "Montag", "Dienstag", "Mittwoch",
"Donnerstag", "Freitag", "Samstag"];

this.Config.Options.START_MONDAY = true;
}
See functional examples of German and Japanese calendars under Examples
国際仕様のカレンダーを作る
Calendarコンポーネントは国際仕様をサポートします。ロケール(地域)を変えるには、customConfig()メソッドを使ってデフォルトのConfig.Localeオブジェクトをオーバーライドするだけです。サンプルのコードはドイツ仕様のカレンダーになります。
//コンストラクタの呼び出し
var cal1 = new YAHOO.widget.Calendar("cal1","cal1Container");

cal1.prototype.customConfig = function(){
this.Config.Locale.MONTHS_SHORT = ["Jan", "Feb", "M䲦quot;, "Apr", "Mai", "Jun",
"Jul", "Aug", "Sep", "Okt", "Nov", "Dez"];

this.Config.Locale.MONTHS_LONG = ["Januar", "Februar", "M䲺", "April", "Mai",
"Juni", "Juli", "August", "September",
"Oktober", "November", "Dezember"];

this.Config.Locale.WEEKDAYS_1CHAR = ["S", "M", "D", "M", "D", "F", "S"];

this.Config.Locale.WEEKDAYS_SHORT = ["So", "Mo", "Di", "Mi", "Do", "Fr", "Sa"];

this.Config.Locale.WEEKDAYS_MEDIUM = ["Son", "Mon", "Die", "Mit", "Don", "Fre", "Sam"];

this.Config.Locale.WEEKDAYS_LONG =["Sonntag", "Montag", "Dienstag", "Mittwoch",
"Donnerstag", "Freitag", "Samstag"];

this.Config.Options.START_MONDAY = true;
}

*customConfig()が、プロパティを代入する式全体を覆っていることに気をつけてください
*一部文字化けアリ
Customizing the Calendar
The behavior and appearance of the calendar can be customized by overriding the Calendar components events and rendering methods. The primary way to specify rendering behavior for a date or group of dates is by using the addRenderer method. The addRenderer method takes two parameters:
- sDates - The date string to change the style/behavior for. This string is specified in the same way as the string used in the constructor (e.g., "12/24/2005,12/25,1/18/2006-1/21/2006").
- fnRender - The function to execute on the active cell. More details below.
Render functions take two arguments: the date object representing the current calendar cell and the calendar cell itself. For example, the default method that renders a selectable cell looks like this:
renderCellDefault = function(workingDate, cell) {
   cell.innerHTML = "";
   var link = document.createElement("a");

   link.href="javascript:void(null);"
   link.name=this.id+"__"+cal.getFullYear()+"_"+(cal.getMonth()+1)+"_"+cal.getDate();

   link.onclick = this._selectEvent;

   link.appendChild(document.createTextNode(this.buildDayLabel(workingDate)));
   cell.appendChild(link);
}
Note that the above method sets the contents of the cell, along with the behavior of the cell. Render methods can also simply set the style of a particular date cell that already has had its contents set:
renderCellNotThisMonth = function(workingDate, cell) {
   Calendar.setCssClasses(cell, [this.Config.Style.CSS_CELL,this.Config.Style.CSS_CELL_BLANK]);
   cell.innerHTML=workingDate.getDate();
   return true;
}
This example renders a cell that is outside of the scope of the current month. Note that it returns a value of Calendar.STOP_RENDER, which means that if this rule is processed, no more rules should be processed afterwards.
Render rules are processed in a LIFO (stack) method, where the last renderer added will be the first processed.
カレンダーのカスタマイズ
カレンダーの見せ方はCalendarコンポーネント・イベントと描画メソッドをオーバーライドすることでカスタマイズできます。「日」の見せ方を変えるのであれば、addRenderer()メソッドを使うのが主要なやり方です。addRenderer()メソッドは2つパラメータをとります。
- sDates - スタイルや振る舞いを変えるの「日」の文字列。この文字列は、コンストラクタで文字列を扱うように指定します。
(e.g., "12/24/2005,12/25,1/18/2006-1/21/2006").
- fnRender() -アクティブなセル上で呼び出される関数です。詳細は下記。
Render関数は、2つの引数をとります。
カレンダーセルをあらわす日付オブジェクトとカレンダーのセルそのものです。デフォルトのメソッドは、選択可能なセルをこんな風に描画します。renderCellDefault = function(workingDate, cell) { cell.innerHTML = ""; var link = document.createElement("a"); link.href="javascript:void(null);" link.name=this.id+"__"+cal.getFullYear()+"_"+(cal.getMonth()+1)+"_"+cal.getDate(); link.onclick = this._selectEvent; link.appendChild(document.createTextNode(this.buildDayLabel(workingDate))); cell.appendChild(link); }上記のメソッドは、セル内のコンテンツをセットし、またセルの振る舞い(見え方?)に従うことを頭に入れておいてください。Render()メソッドを使うと、すでにコンテンツのセットを従えている日付セルのスタイルを簡単に変えることも出来ます。
renderCellNotThisMonth = function(workingDate, cell) {
   Calendar.setCssClasses(cell, [this.Config.Style.CSS_CELL,this.Config.Style.CSS_CELL_BLANK]);
   cell.innerHTML=workingDate.getDate();
   return true;
}
このサンプルでは、現在の月のスコープ外のセルを書いています。Calendar.STOP_RENDERを戻り値として返すことを覚えておいてください。もしこの命令が処理されると、その後の処命令の処理が一切されないということです。
描画の命令は、LIFO()メソッド[stack]で処理されます。最後に付け加えた命令が、一番最初に処理されます。
Customizing Events
The calendar also has several events (see API documentation) that can be customized to alter the calendar's behavior. One such example is the onBeforeSelect event, which by default clears all other selections when a selection is made. By overriding this event (as in the example linked below) a multi-select calendar implementation can be easily created.
イベントのカスタマイズ
Calendarクラスには、カレンダーの振る舞いを変えられるようなイベントがあります。(APIドキュメントを参照してください)その一つして、onBeforeSelectイベントがあります。?これは、カレンダーを選択した時、他の選択を初期値へとクリアします。?このイベントをオーバーライドすることで、複数の日付を選択可能なカレンダーを簡単に作り出せます。


